Joann
-----------------
CONTENTS:
-11/09...The Work Island
-11/10...The Turkey & Rectangular Cutting Board
-11/11...Paddle Cutting Board, Knives, Onion & Celery, Dressing
-11/12...Seasoning Tin, Broth Cans, Recipe Folder & Recipes, Measuring Cup
-11/13...Apron, Dish Towels, Potholders
-11/14...Spice Jars
-11/17...Kitchen Gadgets
------------------------------------------
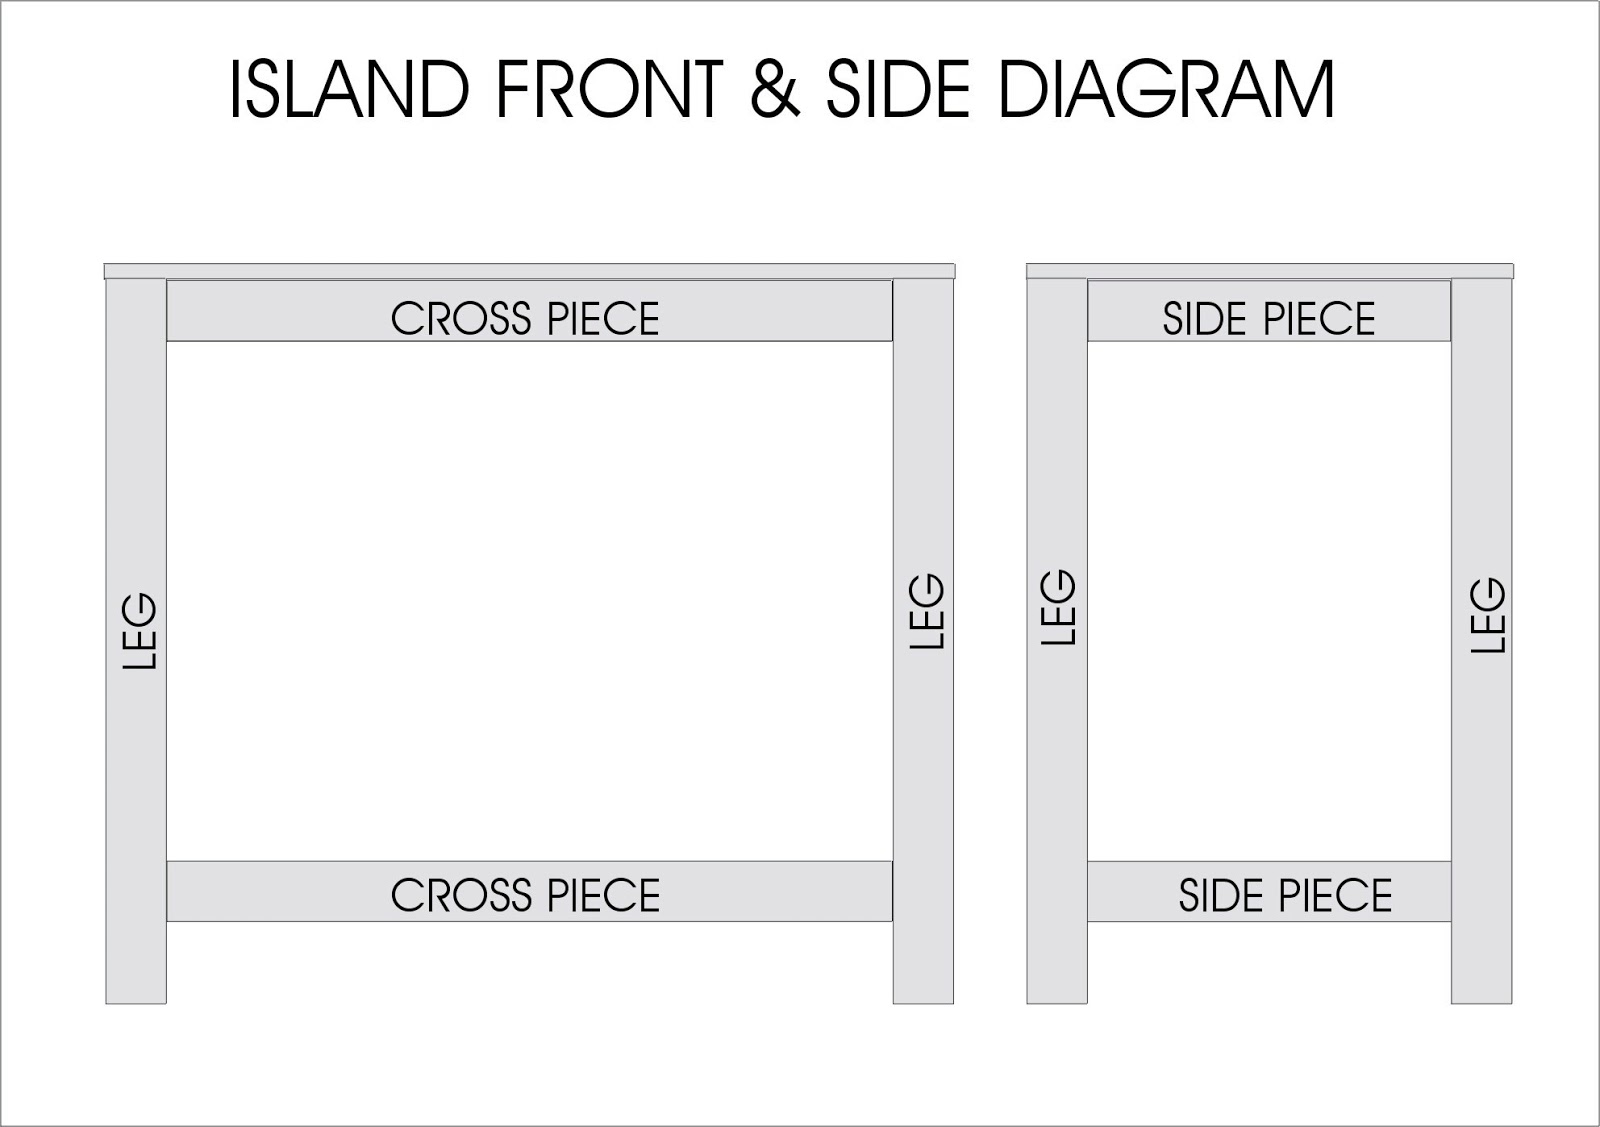
THE
WORK ISLAND
From ¼” square
stripwood cut four, 3” legs; four, 1 ½” end pieces; four cross pieces, 3” x
¼”; two uprights, 7 ¼” x ¼”. From 3/8” x 3/32” stripwood cut a top 4-1/8”
long and a shelf 3 ½” long. From 1/16” or 3/32” thick bookboard, matboard or
sheetwood cut two tops and two bottoms 3 ½” x 2”. Cut out ¼” squares from each corner of the
bottom piece. For shelf and top
brackets, cut twelve ,¼” thick slices from 13/32”colonial
moulding (Lowes) or similar moulding (check with you miniature dealer).
Set to print at exact/actual size or 8.22"w x 8.78"h
---------------------------
Glue the end of one cross piece between two
legs, top edges flush. Glue the ends of
another cross pieces between these legs, set up 5/15” from the bottom of the
legs. Repeat for the other two legs and
cross pieces.
Set to print at actual/exact size or 6.61"w x 4.66"h
----------------------
Join the front and back sections with the side pieces,
keeping all squared-up.
Glue a top and a bottom piece in place.
Glue an upright to each side of the island, centered,
side to side.
Glue the shelf between the uprights, centered side to
side, positioned as desired, keeping in mind the height of something you may
choose to display on it…as seen it is approx. 1” down from the top.
Glue the top in place on the tops of the uprights,
centered side to side and front to back.
Glue the 12 brackets in place as shown.
Set to print at actual/exact size or 7.90"w x 9.44"h
-------------------
Sand the piece smooth with fine sandpaper.
Paint the island as desired. As seen it is a “Martha” green. White or pale blue would also be good
choices. You may choose to age/antique for a shabby
chic look with sandpaper and/or a very light dry-brush of brown stain. For a more
modern look you may choose to paint your island a metallic, stainless steel.
Paint the 2nd set of top and shelf pieces with
a raw sienna color acrylic. When the
paint is dry, dry-brush, side to side, over it with a brown acrylic stain
using a fairly stiff–bristled, flat paint brush, to achieve a wood, chopping-board-like effect. You may also just paint over the base coat with the stain
and then wipe back off, side to side, until you are pleased with the look. If the stain is too dark use a damp cloth will
remove it. Buff the two pieces to a
slight sheen. Glue the top and
bottom in place. The bottom will slide
in sideways.
================================
THE
TURKEY
I highly recommend that you do a “raw turkey” image search
and print out a photo or two of one to use as a guide…a picture is worth a 1000
words here.
Form the turkey on a small
piece of glass or ceramic tile on which it will be baked. Fimo #43 Flesh was used for modeling
the turkey.
For the body start
with a ¾” diam. ball of Fimo; shape the ball so it is higher in the center and
slightly tapered at the ends and flat on the bottom.
For each leg start with a 3/8” diam. ball and with the
help of a round toothpick, shape it per diagram. Lightly press the large part of the legs to
the body until secure. With the aid of a
round toothpick, smooth the leg to
the body where the skin naturally would be attached.
Each wing starts with a ¼” ball. Shape them into long, thin triangles. Slightly pinch & mold one side to a
narrower shape and bend to a wing shapes.
Attach the wings to the body.
Smooth wing and body together with a toothpick where they would naturally
be attached.
With a toothpick open up the neck end of the body as much
as possible without disturbing the overall shape and create the illusion of a
flap of skin hanging out.
Texture the whole body by pressing a small piece of very coarse sandpaper over it.
Scrape a red or
deep pink pastel (chalk) to get some powder. Use a paint brush to apply, lightly, to the
turkey in a dabbing motion, concentrating a deeper color in the open cavity, on
the wing & leg ends.
Bake the turkey on the glass or tile according to Fimo
package directions.
When the piece is cool, add
more coloring if necessary. Glaze
lightly with an acrylic semi-gloss
varnish that is compatible with the Fimo.
===========================
Rectangular
Cutting Board
Cut a 1 ½” x 1” piece from 1/16” thick bass sheetwood. Trim
the two short ends with 1” long pieces of 1/16”
square stripwood using wood glue. When glue has set, use fine sandpaper to sand the board very smooth. Finish the board with a light rubbing of vegetable oil.
-----------------------------------------------------
Paddle-Shaped
Cutting Board
Cut out printie of
cutting board and glue-stick it
to a piece of 1/16” thick bass sheetwood. Use a combination of craft knife, round files, and sandpaper to trim the wood to the
paper pattern. Peel off paper and sand
whole cutting board smooth. Finish by
rubbing in a light coat of vegetable oil.
Set to print at exact/actual size or 1.00"w x 2.00"h
-------------
Knife
Use printies of the patterns as guides to cut out knife
blades from tooling aluminum or a disposable,
aluminum pie plate. I find this
easiest by cutting out the blade patterns and gluing them to the aluminum with
glue stick and then peeling the paper off after cutting out the blades.
Cut and shape the
handles from round wooden tooth picks or
sandwich picks. Carefully slit the
handle top to open it and insert the blade with a dab of glue. Clamp together until the glue has set.
Paint, stain or oil the
handles as desired.
Tiny “rivets” may be
added to the handles using brass paint & the tip of a round toothpick.
----------------------
Onion
Bake according to package directions. Using a real onion as a guide, mix an onion-skin color of acrylic paints. Make a wash of this color by adding
water. Poke a pointed stylus or such into the onion to hold it while
painting. Mark point opposite the stylus
lightly with a pencil. Paint the onion with the acrylic wash, using a small, flat bristled brush and stroking
the color on from end to end, all the way around. This should give you a slightly variegated color,
with a “striped” effect. When
the wash has dried you may choose to add more lines if need. Finish with a light coat of a semi-gloss acrylic medium. Do this for a whole and to the one to be halved
onion, leaving one plain to chop up.
For the whole or halved onion look at the ends of your
life-sized onion and from each end cut a smidgen Holding these bits in your fingertips,
add glue to the end to hold them together.
When the glue has set, trim to scaled-size and with scissors fray out
the ends. Adhere the glued end to you
onion. Repeat for other end.
For display, cut one finished onion in half and use just
one of the halves. If desired a whole
onion may sit alongside it.
Cut the unpainted onion in half and then chop one of the
halves into tiny bits for display on the chopping paddle & to add to the
dressing.
--------------------------------------
Celery
Pull a length of light-green floral tape and then twist
it tightly. Using small sharp scissors
cut snippets from the twisted tape. Pile
onto cutting paddle and reserve some for the dressing. http://www.amazon.com/FLORAL-TAPE-LIGHT-GREEN
----------------------
Dressing
Choose a large
bowl for your dressing from your collection or just for fun, make one as I did…I used a
fine razor saw to slice a round fishing Bobber in half using the two colors as
a guide. Remove whatever is inside and
sand any roughness smooth with fine sandpaper.
Peel the paper off both sides of a scrap of foamcore and cut the slices up into tiny square-like
pieces for bread cubes.
Mix a toasty-brown color
with acrylics and add a bit of water.
Drop the prepared bread cubes into a disposable container and brush over them
with the paint until they look toasted. Let them dry a bit, stirring occasionally
until the paint is set. (I want to
mention here what I think are the greatest disposable, water & paint mixing
containers…FAGE brand Greek Yogurt containers.
As you can see in the photo there are two parts, a large one and a small
one. They are deep and stable and if
your family eats yogurt like mine you will accumulate them quite fast…COSTCO
sells it by the case.)
Assemble your dressing components, adding other items if
desired, and put them in your bowl. Pour
in a bit of semi-gloss acrylic medium and toss until the mixture looks good
to you…you may sprinkle on a bit more celery
if it is “hiding”.
Add a large spoon or as I
did, a faux spoon (handle only) shaped
from a wooden sandwich pick.
-------------------------------------------
Family Recipe Folder &
Recipes
Print the folder onto matte
presentation paper.
Cut out, score and fold on all lines…folding bottom tabs in. Glue a
tab, each, to front and back sections of folder.
For ties, use green sewing thread. Insert thread on a fine needle, knotting end. From inside poke needle into folder just inside the pocket fold, to hide the knot. Put a tiny dab of glue on the knot to hold. Leave enough thread extending to allow you to tie a bow and then knot the end, leaving enough length past the knot to allow you to fray out the thread end,, tassel-like. Repeat for other side.
Print recipes onto bright
white paper. Cut out and place in
folder. Of course the fun part of this
little project is to print out your own family or special recipes to fill the
folder. This could be a darling
table-gift for family members on Thanksgiving.
--------------------
Cans
of Broth
Make printie
of the broth labels with extending paper.
Starting at the blank end of the printie tightly roll it up forming the
can….it should be ¼” across; glue to hold.
Set to print at actual/exact size or 1.50"H x 8.75"W
Print onto bright white paper at best settings
-----------------
-----------------------
Old
Bay Seasoning Tin
From wood, stacks of matboard, Fimo/Sculpey, or foamcore,
make a can that is the size of the
front/back/sides as illustrated. Lightly
round-off the 4 long edges of the sides.
Cut out and fold the label
printie. Use glue stick to adhere the label to the can, side over tab.
Set to print at actual/exact size or 2.50:w x 1.75"h
Print onto bright white paper at best settings.
-------------------------------
Broth in Measuring Cup
Look thru your stash for small plastic tubes, the types that may
hold seed beads and such. These can vary
in size but for the measuring cup as seen has an approx. ¼” diam. Use a razor
saw in a miter box http://www.amazon.com/Midwest-Products-Hobby-Craft-Deluxe/dp to cut
a 3/8” high section, starting the cut from the bottom of the tube. Note: of
course the tubes only have one bottom but you can cut more pieces from a tube and
add a punched round of clear plastic (think bubble wrap. Use cyanoacrylate glue or clear nail polish
to adhere the bottom. Clean the cut edge with a fine file.

Now the tricky part….you can
use a heat gun, as I did, or a hair dryer, which I think may be easier because it
is not as hot. I held the heat gun
between my knees to keep my hands free.
Hold the prepared tube section in one hand and a pair of round nose
beading pliers in the other. Hold the
tube over the heat for just a second. Immediately
grasp the lip with the pliers and pull down to shape a pouring lip. You may need to heat it again to get the
shape you want. This is actually a very
easy procedure but the amount of heat needed is tricky because too much can
almost melt your piece. I suggest you practice on scrap pieces of
plastic to see how much heat is needed
to make your piece pliable.
From a piece of plastic
sheeting…I save blister packs from various items to use for these types of
projects…punch out a 3/16” round with a paper punch. Center a ¼” round paper punch over the punched
hole to create a punched ring. Cut the
ring in half and hold it up to your measuring cup to check for fit and size…make
any adjustments with scissors. Holding
the handle with tweezers dip the ends into cyanoacrylate glue (Super/Crazy etc.) and apply to side
of cup, making sure it is lined-up correctly.
Let glue set.
To fill with broth, mix some
bright yellow nail polish into a clear nail polish for a translucent look and
carefully fill the cup as desired, drop by drop.
==========================
Make copies of the apron
& pocket. You may choose to print
them onto bright white paper at best printer settings or printer fabric at
regular settings. I have done both and like them equally. But I love EQ Printables cotton lawn inkjet
fabric sheets. They are pricey but they
are 240 thread count and so easy to work with.
Put a very thin line of
tacky glue on very back edges of the sides & on the bottom edge and on
lines between the pocket sections on the separate pocket piece. Adhere it to the apron, lining everything
up. Let glue set.
Using about 4 ½” of 1/8”
wide green silk ribbon and fabric glue, encase the top edge of the apron,
centering it from side to side, and then gluing the ribbon extensions in half.
The apron strings were tied
in a knot at the top so they could hang from the island. Then for a natural look the apron was folded and
creased and the pockets were puffed out a bit.
If you are using paper you
may choose to coat the apron with an acrylic matte medium.
Dish Towels
Create printies onto bright white paper or printer
fabric. Paper printies should backed
with a fine cotton fabric such as a handkerchief. If desired, the ends of the
towels may be encased in silk ribbon to match the apron. Fold and crease into
thirds and then in half. Dabs of glue
may be used to hold shape if necessary.
Towels of paper may be coated with an acrylic matte medium.
Two towels were hung on the
one side of the island from towel bars formed from heavy wire. Holes were drilled into the island and the
ends of the wire were glued in place.
There is also a towel
hanging in the front of the island. It
is on a ½” brass ring. On the top of the
ring I glued on a thin piece of copper tape.
The towel was draped over the ring and the ring was glued to the island
by the copper tape.
Pot Holders
Make either paper or fabric
prints of the potholders. For the
backing on mine I used a scrap of green cross stitch fabric, Aida 18
count. A piece of fine felt would also
work. Cut the backing to size and in the upper corner glue a small thread loop
for hanging. Glue the potholder printie
over the backing and press flat. If you are so inclined you may choose to add some top-stitching.
==========
Spice Jars
Create printies
of spice labels onto bright white paper and cut out strips. Paint the top of a length of ¼” dowel with white acrylic craft paint. Using a quality glue-stick, adhere a label to
the dowel, top edges flush. Use a razor saw in a miter box to cut the
dowel off at the bottom of the label….this makes the job so easy because you don’t
have to measure anything. Paint the
bottom of the spice jar white. You can
also work on two jars at a time by gluing a label on each end of the dowel at the
same time. Oh, and use fine sandpaper as
needed on ends of dowel before adding the labels

For lids, use a ¼” round paper punch to punch out
rounds from matte board. Color the lids in your choice of colors, I
have some of these jars in full size and some have black lids and others a jadeite
green. I used a black Sharpie Pen to
color mine.. Glue the lid on top of the
jar. Finish the jar and lid with a
couple of coats of clear nail enamel or a semi-gloss acrylic medium…whichever
is more compatible with your printer ink.
PS....I hope you set your jars on your shelf straighter than I did...close-up photos can kill you, lol.
=======================
COOKING GADGETS
WHIP


Cut
a 6” length of size #24 wire and, with the help of needle nose pliers, shape the
whip frame as shown. Use wire cutters to snip off the excess wire.
Cut
a 3/8” length of 3/32”sq. bass stripwood or a round toothpick, (slightly up from
the a pointed end). Drill a hole in one
end of the wood, deep and wide enough to take the wire ends. A pin vise works well here.
Use
sandpaper to shape and smooth the handle.
Use
a needle or pin to insert some tacky glue into the hole – not enough glue to plug the hole up but rather to seal the wood in the hole.
When the glue has set, dip the wire ends into cyanoacrylate glue (Super/Crazy, etc.) and then insert into the prepared handle. Let glue set.
Cut
lengths of #34 beading wire and glue to one side of the frame as shown. When the glue has set, use wire cutters to
nip of excess wire. Paint the handle as
desired.
-----------------------


Cut
a 6” length of #24 galvanized wire, and starting at its center, shape masher
using needlenose pliers. Bend wire ends
up and twist 3 times, pig-tail style.
Cut off one wire close to twist and leave the other wire slightly
longer.
For
the handle, cut a 3/8” of round toothpick or dowel of similar diam. Drill a hole in ine end deep enough to take
the projecting wire end on the masher.
Sand ends of handle smooth with sandpaper
Use
a needle or pin to insert some tacky glue into the whole – not enough to plug it up but rather to seal the wood in the hole.
When the glue has set, dip the wire ends into cyanoacrylate glue(Super/Crazy,
etc.) and then insert into the prepared handle.
Let glue set. Paint handle as
desired.
SPATULA


Cut
Spatula of thin tin or aluminum (a disposable pie-plate works well).
For
handle, cut a 3/8” length of round tooth pick or dowel of approx. the same
diam. Using fine sandpaper, round off
the ends and slightly flatten two sides. Carefully cut a slit in one end of the
handle with a razor blade, deep enough to take the tab of the spatula. Note: be careful and don’t cut your fingers!
Insert
some tacky glue into the slit to seal the wood.
When the glue has set, dip the tab end of the spatula into cyanoacrylate
glue (Super/Crazy, etc.) and then insert it into the prepared handle. Let glue set.
Paint the handle as desired.
--------------------------
ROLLING PINS
(from
my 1983 booklet, Granny’s Kitchen…oh my, where have the years gone?)


Materials: 3/16” doweling (7/8” long) +
round toothpick + straight pin + Pin vise (small hand-held drill) and
.035 drill bit + flat file
+ medium and finishing grades
sandpaper + Tacky type glue +
Cyanoacrylate glue (super/Crazy, etc.) +
Linseed or vegetable oil
Instructions:
Plain Handle-
For
roller, sand the dowel very smooth with sandpapers. Drill a 1/8” deep hole in the center of each
end of the dowel. For handles, push a
pointed end of a toothpick into a drilled hole & mark where toothpick meets
dowel. Remove toothpick and measure up ¼”
from mark. Cut off at this point. Round
off cut end with sandpaper. Repeat for
other end of roller. Paint handles as
desired. Glue pointed ends into roller. Rub roller with oil.

Revolving Handle-
Cut,
sand and finish roller as for plain style. Drill a hole completely thru center
of dowel (end to end). You may find it
easier to drill halfway thru one end and halfway thru the other.
Cut a round toothpick in half and cut two ¼”
long pieces, one from each cut end. Round one end each with sandpaper. Handles may be painted or left as is.
Use
a straight pin to poke a 1/16” deep hole in each unrounded end of the
handles. Use wire cutters to nip the
head off of a straight pin, leaving a 1” length. File the cut end to a point.
Treat
holes in the handles with a bit of tacky glue to seal wood without clogging the
holes. Dip one end of the prepared pin
into cyanoacrylate glue and push it into one handle. Insert pin thru the dowel roller and then
glue on the 2nd handle to the extending pin in the same manner as
the other one. Be careful not to glue
the handles to the end of the roller.
Finish
roller with oil.