

AMERICANA MEMORBILIA PEDDLER’S CART
In the past I have given you two
other Peddler’s Carts projects, Baskets & Bunnies with an Easter theme (April 2011)
and a Halloween Cart (Sept. 26, 2011).
These carts have been so well received and fun to fill that I have created
a third in what has become a series, AMERICANA MEMORBILIA. This cart has a patriotic, red, white and
blue theme. Over the next few weeks I
will periodically be adding themed projects to fill in and around the
cart. I am sure you will also come up
with some ideas of your own or find miniatures in you collection to add to the cart’s
display. You may also choose to not
build the cart itself and just create the smaller projects, picking and
choosing from them to use or display as desired.
Don’t forget to check back often
to see what has been added.

=======================================


PROJECT #5: PULL TOYS


PROJECT #4: BUCKET OF FLAGS


PROJECT #3: UNCLE SAM HATS
 -------------------

PROJECT # 2: PINWHEELS


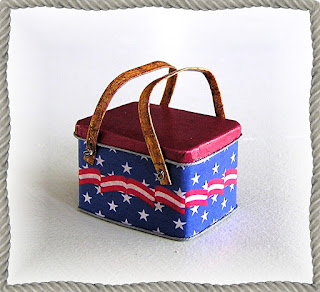
PROJECT #6: A VINTAGE PICNIC
TIN

Full-size
picnic tins are a passion of mine. This is a scaled down version of one from my
collection. Display it closed or open and filled.

You will need: a
piece of wood 1 ¼” L x 7/8” D x ¾” H (to
be used as a form or a base…see instructions.
If you don’t have this size stripwood be creative & stack thinner pieces together to get the
needed thickness or make the piece from
Fimo or Sculpey clays) + dull, silver metallic cardstock + silver inked pen or water color pencil + Crafter’s Pick Ultimate Glue http://www.amazon.com/Crafters-Pick-60134-Ultimate + quality glue stick http://www.amazon.com/Avery-Glue-Stic + printies on bright white paper
http://www.amazon.com/Epson-Bright-8-5x11-Inches + cotton
buttonhole/top stitch thread + Rub ‘n Buff in silver http://www.amazon.com/AMACO-Metallic-Finish-Silver + a satin or semi-gloss finish that is
compatible with your printer ink + ¼” silver or aluminum colored tape http://www.amazon.com/Glass-Foil-Tape-Inch-Roll-Aluminum + #34
gauge silver wire http://www.amazon.com/Gauge-Silver-Beading-Darice-32026
Instructions:
WORKING PICNIC TIN
A bit fiddly to make but
the realism is worth the effort.
Here the piece of wood called for
above will be used as a form to be removed after the tin is completed. You will be able to open and close the tin
and fill it as desired.
Round off corners and edges of the wood form with
sandpaper and sand smooth.

Print out at exact/actual size or 5.23" w x 2.26" h
--------------------------
For the sides
of the tin’s base, cut a strip of dull, silver metallic cardstock, 4 ½” x ¾”. Wrap the cardstock strip around the wood form
to shape, silver side in and starting at center back. Mark the overlap on both strip ends. Remove the strip from the form. Draw a line where marked & lightly score
the lines, one on a white side and one on a silver side, with just enough pressure to cut only the top
surface of the cardstock. Gently pull
the top layer of the paper off the scored sections, one silver, one white. This will make the overlapped seam less thick
and noticeable.
Use a silver
inked pen to color the top edge of the cardstock strip…this side will be the
top of the side piece.

Print out at actual/exact size or 5.47"w x 3.21"h
-------------
Wrap the
prepared strip back around the form, silver side in, gluing the piece together
by prepared overlap sections. This
forms the “metal” interior of the base.
Leave the cardstock sides on the form through the next steps.
Push the
base-sides slightly down the form so that its bottom edge is not touching the
form. Run a thin line of Crafter’s Pick
Ultimate Glue around the very bottom edge of the sides that is extending off
the form. Press the side piece onto a
scrap of the silver cardstock, silver side facing up. When the glue has completely set, trim the
bottom piece to fit flush with the base sides.
Slide the base back up the form.
Coat the
bottom of the base with glue stick and press it onto another scrap of silver
cardstock, this time with the silver side facing outward. Make sure the two bottoms are firmly and
smoothly together. When glue has set,
trim the 2nd bottom to the size of the first.

With the
cardstock base still on the form, use a gluestick to cover the exterior sides. Coat the back of the tin side’s printie and
apply it smoothly & evenly to the cardstock base. Center the printie on the front of the tine
and start and stop at center back with a slight overlap. This forms the tin’s base.

Set to print at actual/exact size or 5.79"w x 2.57"h
Print onto bright white paper using best printer settings.
-------------------------------
For the lid’s
sides, cut a 3/32” x 4 ¼” strip of the silver cardstock. Wrap this strip around the outside of the
tin’s base, which is still on the form.
Overlap and glue the lid’s side piece, following the procedure described
above for the tin’s sides. When glue has
set, push the lid side strip slightly up and over the tin’s base so the top
edge of the lid’s side piece is not touching the base sides. Run a thin line of glue along top edge of lid
side and press silver cardstock lid top onto it, silver side down. When the glue has set, trim the cardstock lid
to fit the lid’s side piece. This
procedure will give you a perfectly filling lid.
Using glue
stick, coat the top of the lid and then press on the lid printie, centering
it. Make sure all edges are glued
down. Slightly round-off corners of
printie with scissors. Clip all around corners. Apply glue, not gluestick, on underside of
clipped corners and edges of lid printie and press to lid sides. Trim cover paper to fit sides and remove any
excess corner paper as needed, for a smooth finish. Use thumbnail to fully smooth the corners.

Print at actual/exact size or 4.93"w x 4.70"h
Print onto bright white paper at best printer settings.
-------------------
Cut a length
of cotton buttonhole thread & coat smoothly
with Silver Rub’n Buff and hang to dry.
Use this to trim around the bottom edge of the lid and base, starting
and stopping at center back, using Ultimate glue sparingly and wiping away any
excess for a neat finish.

Coat the
outside of the tin’s base with a satin or semi-gloss, clear finish that is
compatible with your printer ink. I use
Epson ink and use clear nail polish.
Test the finishes you use on a sample sheet before antiquing or glossin
your picnic tin. Remove tin from form.
For hinges,
cut two pieces of silver/aluminum tape, 3/32” x 3/32”. With lid in place on base, press 1/2 of one
of the hinges onto the back of the lid, 1/8” in from the sides. Smooth it down and over the edge trim, and
down onto the tin base. Repeat for the 2nd
hinge. Open and close the lid several
times. If the tape does not want to
stick, gently lift it up, a section at a time and add Ultimate glue to hold.


For the handles,
cut the two strips from the handle-paper-printie. Fold
each strip into thirds, holding with glue for a 1/16” width. Shape handles per
diagram. Poke tiny holes thru handles on
each end, approx. 3/32” in from the sides.
On the tin, measure in 3/16” from side edges of base, and 1/16” down
from bottom of lid, where it sits on the tin.
Mark small dots at these four points.
The marks on the back will be on the hinges. Using a needle or straight pin, poke small
holes thru the marks on the tin. Cut
four pieces of #34 gauge silver wire, 1” long.
Tie a tight knot in the center of each wire, using needle nose pliers to
pull the wire. Fold wire ends down away
from the knot for a double thickness of wire.
Insert a prepared wire into a hole in one handle end. Pull wire thru until the knot is against the
handle. Using needle-nose pliers, crimp
knot to handle. Insert ends of this wire
into a hole in the tin base, open lid and pull wires thru. Holding wire knot tightly to the tin base
from the outside, flay wires out in opposite directions until they touch the
inside wall of the tin. Clip off wire
ends to approx. 1/16” each. Repeat this
procedure for all four ends of handles, reshaping the handle as needed to
conform to the shape of the picnic tin.
The handles should be able to glide up and over the top of the tin and
back down to the sides with relative ease.
When the handles are working, as they should, antique & coat them
with a semi-gloss finish as was done for tin.
Display your picnic tin open or closed.

Set to print at actual/exact size or 3.16"w x 3.45"h
Print onto bright white paper at best printer settings.
--------------
FAUX PICNIC TIN
An easier version to make and good for
display but it will not open.
Prepare a piece of wood 1 ¼” L x 7/8” D x ¾” H by rounding off corners and edges with sandpaper and sand smooth….this will be used as a base for the tin. If you don’t have this size stripwood be
creative & stack thinner pieces together to get the needed thickness or make
the piece from Fimo or Sculpey clays).
Glue the tin’s side printie around the wood
base, centering it on the front & overlapping slightly on center back.
Glue a piece
of silver/aluminum colored cardstock
to the bottom of the tin, silver side down.
When glue has set, trim cardstock to match base.
Glue the red lid printie centered to the top of the
base. Clip corners in several places and
then glue down the sides. Use thumb nail
to smooth the corners as flat as possible.
Coat a length
of cotton buttonhole/top stitch thread
with silver Rub ‘n Buff. When it has dried, glue it around bottom edge
of sides, starting and stopping at center back and around bottom edge of the lid,
starting and stopping at center back.
Prepare &
add faux back hinges as described for open version of tin.
Prepare
handles from printies as described for the open version of the tin. Either glue in place as desired or attach to tin
with #18 brass escutcheon pins. http://craft-inc.myshopify.com/products/copy-of-15-solid-brass-escutcheon-pins
Antique/age
the tin as described for the open version.
If desired, do a search for vintage picnic tins for many other covering designs to use with these patterns.

===========================================

Always
a favorite with tots, vintage pull toys are also used as home décor. This a fun little project. The results can find a place in your
miniature settings, from a children’s room to a table top or, of course, on the
shelves of a toy store.
=====================
General Instructions:
Create
printies onto matte presentation paper at best printer settings. Carefully cut
out printies. Color the very edges of
the cut-outs with a damp, black water color pencil…don’t forget to do this as
it gets rid of the paper look.
Knead
Fimo until it is pliable. Lay it on a
piece of glass. Place two lengths of
1/8” thick stripwood on either side of the Fimo. Using a small rolling pin or something
similar, roll out the Fimo to a 1/8” thickness by letting the ends of the
rolling pin rest on the strip wood.

Glue-stick
one of your cutouts to the prepared Fimo.
Let the Fimo sit for a bit the warmth of working it is gone & it is
harder. Using a fine tipped knife
carefully cut around the printie, keeping the cuts straight up and down. Turn the piece over and glue the mirror image
printie in place. Use a round toothpick
or what-have-you to smooth out the cut edges and trim as needed. Bake the prepared assembly on glass or tile
following Fimo package directions. Add a tiny scrap of your Fimo of the same
thickness as your work and this can be used to test for doneness….when cool it
should be somewhat flexible without breaking or chipping. Note: It
is a really good idea to have a small toaster over dedicated to craft use. A simple model of these can be had a very low
price http://www.amazon.com/Maxi-Matic-ETO-113-Cuisine-2-Slice-Toaster
Further
prepare your printie assembly per specific instructions as follows.
To
prepare pull-toy base cut a length of stripwood & paint it with acrylic
craft paints. It may be as is or
glossed.
Using
a 3/16” paper punch, create 4 round wheels from 1/16” or so thick paper, color
of your choice. Using a 1/6” round paper
punch, create 4 hubs from scraps of matte presentation paper. Marking the approx. center of the wheels, use
a straight pin to make holes thru the wheels.
Insert a straight pin into and thru a wheel almost to the pin head. Snip off the pin head flush with the outside
of the wheel (wear safety glasses, as the snipped pin can fly). Glue a hub onto the wheel, over the pin
head. Slip a bugle bead onto the other
end of the pin. Push a 2nd
wheel onto the pin and push it almost up to the end of the bugle bead. Snip off the excess pin (don’t forget those
safety glasses) and then glue on a hub.
Make two of the wheel assemblies.
Glue them by the bugle bead to the underside of the prepared stripwood
set in approx. 3/16” from each end.

Cut
approx. 4” of buttonhole thread. Tie a
knot in one end and cut off excess thread to knot…this end will be glued to the
front end of the base. Tie another knot
approx. 2 ½” away from the first knot and slip on a seed bead (if the hole in
the seed bead is large than your knot, create a double knot). Tie a knot at the other side of the seed
bead, snugged up next to it. Cut off
thread approx. 1/8” beyond the seed bead and fray out the cut end.
Specific Directions:
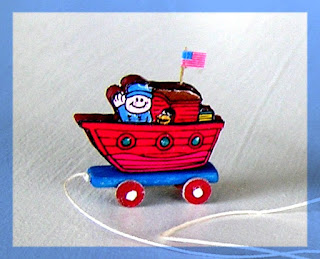
SHIP AHOY PULL TOY

Cut
out the extra boat bottom printies and glue them to a scrap of matte
presentation paper for a double thickness.
When the glue has set cut them out.
Color edges with black water color pencil. Glue over the like image on the baked boat
piece, one to each side.
Paint
area of the Fimo where the brown rooftop would be with acrylic craft paint in a
matching brown.
Cut
out the tiny flag and fold in half on center line. For the flag pole, cut a cat-whisker- like
thickness from a bamboo skewer (bamboo is quite strong, even at this
thickness). Glue it sandwiched between
the flag with just a tiny tip sticking out the top. Cut the entire pole (including the part in
the flag to about 3/8” length. Use a
needle, pin or needle tool to poke a hole in the roof top about a 1/6”
deep. Glue the flag pole into the hole.
Using
Diamond Glaze (a great product with many miniature uses if you haven’t already
tried it http://www.amazon.com/Judikins-GP005-Diamond-Glaze-2-Ounce ) coat the three round windows, the captain’s
hat & clothing, the bird and the roof and the flag.
Glue
the boat bottom centered on the base.
===========================
GIRAFFE

Use
a caramel color Fimo for the giraffe.
Cut off the horns and tail from the printie mirror images. After the
giraffe has been baked cut out the giraffe face/ear mirror image printies,
without the horns. Color the backs of
these pieces to match the light color on the giraffe. Apply glue stick to the
back of the faces but not the ear part. Glue the face pieces to their matching
parts on the giraffe. Bend the ear
sections forward, adding dimension.
On
the top of the giraffe, mark the placements of the horns. Use a pin or needle tool to ream out a
shallow hole wide enough to take a straight pin. For the horns, use wire cutters to cut off approx.
3/16” of a straight pin, measuring from the top of the pin head down. Glue these pieces into the holes in the top
of the head. Paint them a deep grape
color.
For
the tail, use a needle tool, ream out a hole in the back of the giraffe for the
tail. Using a short length of fine
cording (a dark purple color used here), such as Knit-Cro-Sheen, tie a knot a
shirt way up one end. Fray out the short
end of the cord, just past the knot and then cut the fray to approx. 1/8”
length. Cut the other end of the cord to an approx. 3/16”. Add glue to this cut end to stop any
fraying. Insert the glued end into the
reamed hole in the back of the giraffe, holding with glue.
Prepare
the base, wheels, and pull cord per general directions, using colors of your
choice.
Add
Diamond glaze to the eyes and nose.
------------------------------
LIBERTY CHICKEN

Using
a deep blue Fimo http://www.amazon.com/Fimo-Assortment-blocks-assorted-colors prepare mirror image
printies as described in general instructions & bake.
Using
deep yellow acrylic craft paint, color the chicken’s comb, beak, &
waddle. Continue the waddle & beak
color across the Fimo front of the chicken.
You may choose to gloss the yellow if desired.
Cut
four wing sections from the extra printies (don’t forget to color the printed
edges black); cut out and glue mirror images together to form two double
thickness wings. Glue the wings, by
their very front edges, over the wings on the chicken so they are at an angle
from the chicken.
Construct
the base, painting it the same yellow as the chicken’s beak, etc.
-------------------------------------

Click on image to enlarge. Copy & paste to your computer.
Set to print at exact/actual size or 7.70"W x 3.23"H
You may also use the key to scale to get exact size.
Print onto matte presentation paper using best printer settings.
================================================
PROJECT #4: BUCKET OF FLAGS

Make
printies of flags onto bright white
paper. Cut out mirror images as one
piece. Fold in half and glue together
using a quality glue stick. Shape flag, as desired, by gently
rolling with the help of a thin dowel.
Glue
flag edge to a turned-end toothpick, http://www.amazon.com/Norpro-Ornate-Wood-Toothpicks-360-Pack

Toothpicks
may be used as is or stained, painted, or glossed. Completed flags may be painted with a
semi-gloss finish if desired….make sure the finish you choose is compatible
with your printer ink.


Printie for cover paper for your flag container.
Click on image to enlarge. Copy & paste to your computer.
Set to print at size you need to cover your Flag Container.
Print onto bright white paper at best settings.
--------------------------
Display
flags in a container of your choice. As
seen it is a simple, empty plastic container, painted white on the inside and
covered on the outside with a length of ribbon.
A piece of Styrofoam was wedged into the lower half of the container and
flag “poles” were poked into it.

Click on image to enlarge. Copy and paste to your computer.
Set to print at exact/actual size or 6.85"W x 10.02"H
Print onto bright white paper at bet printer settings.
======================================
PROJECT #3: UNCLE SAM HATS

Make
printies onto matte presentation paper.
Cut out a crown, brim, and top piece for each hat. Lay the crown, upside down, on a flat, giving
surface (I use my knee) and roll over it with a piece of 3/16” diam. dowel or such until
it coils over on itself. Glue side over tab.
When glue has set, gently shape crown to shape of top and glue top in
place.

Click on image to enlarge. Copy & paste to your computer.
Set to print at actual/exact size or 7.71" W x 5.15" H
Print onto matte presentation paper using best printer settings.
--------------------------
Color
the bottom and edge of the hat brim to match its blue top, using craft paint or water color pencil. Or you may choose to print extra copies of
the brim, cut them out, and glue them back to back, then coloring only the
edges. Slice an X into the hat brim.
To
slightly turn up the brim edge, place it, right side up, on the palm of your hand or a piece of fun foam and run a large
ball stylus around it slightly away from the edge. Glue crown centered over brim & let glue
set.
With
small or cuticle scissors, cut out
brim’s center to fit crown. Note: If you are using the hats for display
only you need not cut out the brim opening as the bottom will not be seen.
====================================
PROJECT # 2: PINWHEELS

Make color copies of pinwheel paper onto bright white paper. Cut out squares or rectangles; fold rectangles
in half. Glue two squares together, back
to back, using a quality glue stick, applying glue to each backside http://www.amazon.com/Avery-Application-Permanent-Sticks

Click on image to enlarge. Copy and paste to your computer.
Set to print at actual/exact size or 4.8" W x 5.1" H or use the Key to Scale as seen.
Print onto Bright White Paper at best settings.
-----------------------
When glue has set, fold the square
on the two diagonals, creasing strongly; open up. Mark the center of the square with a pencil
dot. Using small, sharp scissors, cut
along the diagonal lines towards the center as shown in diagram.
Put a dab of heavy craft glue such
as Crafter’s Pick Ultimate in the
center of the square.
http://www.amazon.com/Crafters-Pick-60134-Ultimate- Using pointed tweezers, or needle nose pliers, http://www.amazon.com/Beading-Utility-Tweezers-Style , bring alternating points
of the square into the middle using a rolling method. Press
tips into the glue. Where the paper
folds over should be rounded and not creased.
You may have to hold the point down for a bit until the glue grabs.

For the center you will need an
approx. ¼” (from point to point) sequin
star, with or without a hole. These
may be red, white, and blue, gold or silver (a craft or party store
purchase). You will also need a small-bead head straight pin (found
with sewing supplies) in your choice of colors.
Lay the sequin star on a piece of
craft foam or other giving surface.
Poke a bead-head pin into and thru the star and then into and thru the
center of the front of the pinwheel. If
needed, the tiniest dot of glue may be used to hold the star assembly in
place.

Add a dot of glue behind the
pinwheel and slip a small seed bead (your choice of colors) up
until it touched
the pinwheel. Grasp the pin just behind
the bead with needle-nose pliers; bend the pin to form a right angle. Paint pin with white acrylic craft paint.
If desired, clear nail polish or
an acrylic gloss finish (depending on what your printer ink is compatible with)
may be painted on the pinwheels for a glossy finish.
PINWHEEL DISPLAY STAND

Click on image to enlarge. Copy and paste to your computer.
Set to print at actual/exact size or 3.35"W x 1.18"W
Print onto Semi-gloss Photo Paper at best printer settings.
--------------------
Cut
the body of the Pinwheel display stand from a scrap of ½” thick foamcore, using
the semi-circle printie piece as a pattern.
Glue
a printie to the front and back of the foamcore display stand.
Using
scraps of the semi-gloss printie paper, cut a ½” wide trip long enough to fit completely
around the holder. Glue the strip around
the outside of the display stand, starting and stopping at center bottom. Use your thumb nail to meld the side and face
pieces together for a smooth finish.
===================================
PROJECT #1: BIRDHOUSES


----------------------------
BIRD HOUSE STYLE #1

Print birdhouse pattern onto plain paper.
Print patterned paper onto matte
presentation paper. Cut out the
pattern and clip it evenly to the patterned paper; carefully cut out. With pattern still over the patterned paper,
use a pointed stylus and a small
straight edge to score on all fold lines.
http://www.amazon.com/Darice-Broad-Double-Tracing-Stylus/dp/ Mark the entrance hole and
the perch hole. Punch out an entrance
hole by centering a 1/8” round paper
punch http://www.amazon.com/Fiskars-12-23518897-Punch-8-Inch-Circle/
To
create the entrance-hole star, punch a 1/8” hole in yellow craft paper. Center
a ¼” - 5/16” star paper punch http://www.amazon.com/Fiskars-Hand-Punch-Inch-Star/ over the hole and punch out a star. Glue the prepared star over the entrance
hole.
Fold house and glue side over
tab. Fold in bottom section and glue
tabs to inside of bottom of house. Using
tweezers to press tabs to inside walls makes this job easier. Fold top tab to
inside so they are at right angles to the house.
As seen the roof is “tin” cut from
an aluminum tea candle holder. Remove candle (these containers are a good
item to add to your mini stash as they come in handy for many projects) and
using scissors (not your good fabric ones), cut the sides from the bottom. From the side piece cut a 1-1/2” x 5/8”
piece. Lay it on a slightly giving
surface (tablet or scrap of matte board?) and using a pointed stylus draw
around the edges, 1/16 in from the outside of the edges to tool in a
design/rim. Fold the roof piece in half,
open it part way and glue to the roof tabs of the house. You may choose to weather/age/rust your roof
a bit with acrylic craft paints.
Open up the perch hole with a
needle and enlarge with a pointed stylus so it is large enough to take a perch
of your choice…I use snippets of
twigs/grape vines, etc. Glue perch
in hole and snip off excess length to make the perch the size you desire.
This pattern may be used with any number of small patterned papers

Click on pattern to enlarge. Copy and paste to your computer.
Set to print at actual/exact size or 7.42"W x 2.48"H
Print onto matte presentation paper at best printer settings.
------------------------------------------
BIRD HOUSE STYLE # 2

Print house and roof onto matte presentation paper using best
printer settings. Carefully cut out the
pieces. Glue roof pieces back to back & set aside. Use a 1/8” round paper punch to make the
entrance hole by centering the punch over the marked round. Score the tabs and corners of the house (btw,
I find this easier to do before cutting out).
Glue the side over the side tab.
Fold the bottom tabs up and glue them flush into the bottom of the
house. Fold the top tabs back.
Score and fold the prepared roof
piece in half and glue, evenly, it to the top tabs of the house.
Add a perch
as described for house #1 above.

Click on image to enlarge. Copy & paste to your computer.
Set to print at actual/exact size or 4.34"W x 2.14"H
Print onto matte presentation paper using best printer settings.
--------------------------------------------------------
BIRDHOUSE STYLE #3

Cut an 8” length of gold tone Candlewick Yarn or other soft, cotton,
4 strand threads. Fold it in half and thread the looped end of the thread into
a large eyed needle (a darning needle works well). Insert the needle into the bottom hole in the
front of the box and then into & thru the hole in the bottom of the
box. With the thread loop extending out
the bottom of the house insert the ends of the thread into and thru the
loop. Pull the ends of the thread
tightly causing them to rest against the bottom of the house, with the loop
connection at the back edge of the bottom of the house.
Lay the house on a flat surface with the extending two threads straight under
it, side to side. Glue the lettered
blocks to the threads, starting about 3/16” from the bottom of the house &
continuing down the thread with slight separations between each block.. When glue as set tie an overhand knot,
joining the two threads, so the knot is just under the last block. Cut off excess thread leaving about a 3/8”
tail. Fray out the ends of the thread up
to the knot. Using a double thickness of
the thread make a bow that is about 5/8”
from end to end. Cut off extending
thread leaving approx. 5/8” tails. Fray
out the tips of the tails. Glue bow to
tail thread, just under the bottom of the house.
Click on image to enlarge. Copy & paste to your computer.
Set to print at actual/exact size or 5.67"W x 3.09"H
Print onto matte presentation paper at best printer settings.
--------------------------------
* By the way, these birdhouses can make darling
jewelry (earrings &necklaces) if they are finished with a protective
coating of clear acrylic or such.
==================================================

You will need: book/binder’s board (see note
below) in approx. 3/32” thickness + cover paper of your choice or use printie
given here + a quality glue stick
( http://www.amazon.com/Avery-Application-Permanent-Sticks ) + ¼”x 1/16” stripwood + white acrylic craft paint + 3/32” dowel + ¼” square stripwood + 4 straight pins and a wire cutter + ½” X 1/16” stripwood + ¾” x 1/16” stripwood + swag printies on matte presentation paper + 3/16” square styrene tubing http://www.amazon.com/Plastruct-STFS-6-Square-Tubing + two wheels of your choice with an approx. diam, of 1-3/4” to 2-1/8” + printies of signage on matte presentation paper
( http://www.amazon.com/Avery-Application-Permanent-Sticks ) + ¼”x 1/16” stripwood + white acrylic craft paint + 3/32” dowel + ¼” square stripwood + 4 straight pins and a wire cutter + ½” X 1/16” stripwood + ¾” x 1/16” stripwood + swag printies on matte presentation paper + 3/16” square styrene tubing http://www.amazon.com/Plastruct-STFS-6-Square-Tubing + two wheels of your choice with an approx. diam, of 1-3/4” to 2-1/8” + printies of signage on matte presentation paper

You
will be making a simple box using book board.
Note: To try to answer the question many of you have asked, book board (also
called binder’s board) is a type of laminated chipboard. A good quality book board is acid free and is
what is traditionally used for book covers.
It is very dense and strong, consequently it resists warping as sheet
wood can do. It is easily cut by hand
with a sharp craft knife. It comes in a variety of sizes & thicknesses and
can be found in art supply stores, craft stores in scrapbook supplies and http://Amazon.com
offers it from several places including Blick Art Materials. The carts measurements are based on a
thickness of approx. 3/32” which is somewhere around .080 to .082. thickness. You
can use a 1/16” thickness which is approx.060, making any necessary adjustments
overall. As I said it is just a simple,
easy to construct box.

Copy and paste the pattern sheet to your computer.
Set to print at exact/actual size or 6.92"W x 8.99"H
============================


Cut
two sides pieces 5-1/8” x 1-13/16”, two end pieces 2-9/16” x 1-13/16”, a top
and a bottom piece 5-1/8” x 2-3/4”. Glue the edges of a side piece to the
face of the top piece, outside edges flush. Glue the edges of the end
pieces to the face of the top piece and of the side piece, all outside edges
flush. Glue the second side piece in place, long edge to the face of the
top piece and its face to the edges of the end pieces, all edges flush and all
squared up. Glue the face of the bottom piece to the edges of the side
and end pieces forming a closed box.
Cover each piece of the box with a light weight, fine striped wallpaper
in appropriate colors. A quality glue
stick is a good choice for adhesion here.

CART WALLPAPER
Copy and paste image to your computer.
Set to print at actual/exact size or 8.25"W x 10.70"H
Print onto bright white paper using best settings
======================
Cut
four, 2-3/4” lengths of the 1/4” x 1/16” stripwood; paint white. Glue one each to the top and bottom of the
face of the 2 cart ends, all edges flush. Cut four, 1-1/2” pieces of the
¼” x 1/16” stripwood and glue to face of ends, framing in the ends. Do double
check to make sure the measurements given here will fit your cart and make any
necessary adjustments.
Cut a length of 3/32’ dowel slightly longer
than the span between the two holes in the top trim, approx. 4 ½ “. Paint
white. Insert dowel into outside of one
hole and then, with a bit of glue, into inside of the 2nd hole until it is
flush with the outside of the 2nd hole. Trim dowel so it is flush with the
outside of the 1st hole. A bit of glue may be wiped over the
cut ends of the dowel. Lightly sand all dowel ends just a bit & touch
up with paint.. You now have the cart base.

Copy & paste pattern sheet to your computer.
Set to print at exact/actual size or 7.74"W x 10.83"H
======================
From
¼” square stripwood cut four, 4” lengths for the uprights and two 2-5/16”
lengths for cross pieces (double check for the length you will need before
cutting); paint white. Mark an X in the
bottom of each upright to find its center. Insert the end of a straight
pin about 3/16” of an inch up into the center of the X; clip off the pin
leaving about 3/16” extending (Make sure to wear safety glasses as cut pieces
can fly) . Add a bit of glue to the pinned ends of the uprights and pound
them into the corners of the top of the cart, just inside the trim edges.
Make sure they are standing squared-up with the top of the cart.
Glue the braces between the uprights, one in front, one in back, both 1-7/8” up
from top of cart.
From
1/16” thick matboard cut 2 canopy end pieces per pattern. Paint the insides of the canopy-end pieces to
match cart trim (white). Cover the
outsides with the same paper used on the rest of the cart. Glue the prepared
canopy-end pieces to the outside faces of the uprights which include the edges
of the top braces, outside edges flush.
Cut
a 5-3/16” length of ¾” x 1/16” stripwood for canopy top support. Paint the undersides white to match the
cart. Glue the ¾” ends of this piece to
the faces of the canopy end pieces, top edges flush.
Cut
a 4” x 5-3/8” piece of cart wallpaper for canopy. Find the center of the canopy paper and glue
it centered onto the canopy top support and on the top edges of the canopy end
pieces. Slightly crease the paper along
the edges of the top support. Continue
gluing the canopy in place, along the slanted edges of the canopy end pieces;
crease canopy paper along the top braces and then continue gluing the canopy
along the front sides of the top braces.
Doing a dry run with the canopy paper will help with this job.

Copy and paste printie to you computer.
Set to print at actual/exact size or 6.68"W x 8.16"H
Print onto matte presentation paper at best printer settings
=======================
Using
cut-outs from matte presentation paper swag printies, glue a three-swags piece
across sides of cart along face of
bottom edge of canopy. Cut out two
single swag printies with longer star border attached and glue centered to top
ends of cart, in line with the top side printies, Match up star borders and cut
off excess so the border looks like one continuous piece. Cut three-swag printies to fit into cart
sides and glue in place along top edge.
Cut single swag pieces with extending star boarder to fit onside cart
ends, centered side to side.

For the
cart axle cut a 2-1/4” length of 3/16” square, white styrene tubing (a model
railroad supply) http://www.amazon.com/Plastruct-STFS-6-Square-Tubing . Glue
the axle across the bottom of the cart, 1-1/2” away from the back edge of the
cart.

Wheel from Metal Miniatures
For
your cart’s wheels look to 2nd hand stores for interesting wheels on
children’s toys. You will be surprised
at how many interesting ones you will find….not just on trucks and cars but
wagons, carts, etc. As seen on this cart
the wheels are approx. 2-1/8” diam. but
the size can vary depending on what you want and what you find. Metal Miniatures http://metalminis.com/mmWheels.pdf has a 2-1/8” and other size wheels that will
work. Some wheels will be great as is
others will probably need to be painted.
Ou can add black treads by paint or paper strips (quilling paper works
great esp in a pearlized dark grey from lake city craft http://www.amazon.com ). Cut a 3-3/4” length of 3/32”or 1/8” bamboo skewer (bamboo is stronger than
dowel). Use a needle file to make holes
in wheels of a size to take the skewer snuggly.
Push it into a wheel with glue until the an end is flush with the
outside of the wheel. Pass the dowel
thru the axle and add the 2nd wheel.
If necessary or desired hubs may added to cover the ends of the bamboo
dowel. These can be simple punched
rounds, decorative jewelry findings, sequins, etc. Of course these measurements, etc. are just a
generalization and may be adjusted to suit your wheels or tastes.
Cut
a cart foot per pattern (or higher or lower if needed to make cart stand
evenly) from your book board scraps. Cut
a piece of ¼” square stripwood the same length as with width of the foot for a
brace. Glue the brace to one side of the
foot, evenly across the top. Glue the
brace/foot assembly to the underside of the cart, set in ¼” from the front edge
of the cart, centered side to side.

Copy and paste signage printie to your computer.
Set to print at actual/exact size or 8.25"W x 7.93"H
Print onto matte presentation paper using best printer settings.
===============
Print
signage onto matte presentation paper.
Cut out large signs, a worded front and a plain back. Glue them
sandwiched together. Use a black
permanent marker pen to color the very edges of the signs. Fold back the tabs and use them to glue the
signs to the top of the canopy, set back approx. ½” from the front edge. Cut out the smaller signs and glue them to
the canopy end pieces, just above the star border of the swags and centered
side to side. Carefully cut out eagles
and glue them back to back with a 1-1/4” eyepin sandwiched in the center, plain
end of pin extending out the end. Paint
extending pin white. For the base of my
eagle I used a pawn from a chess set but any small turning or even a wooden
bowl turned upside down could be used…look thru your stash. Drill a hole in the top of the turning to
hold the pin and hold with glue. Glue
the eagle assembly centered on the flat top of the canopy.

And there you have it, a peddler's cart ready for you to fill with Americana Memorabilia. As seen the cart sits on a 8" X 10" glass fronted, white picture frame. A printie of a rustic, wooden floor is seen thru the glass. This gives you more display room.
Have fun!

====================================================
Hello Everyone,
It
feels good to finally be back in my workroom…time to myself has been fairly
limited as of late…not complaining because it is all positive, but as the song
goes, “a girls gotta do what a “girls”
gotta do”, and for me that is creating miniatures. So I will continue to squeeze out some time
to get the Americana Cart filled
up. Do let me know how you are enjoying
the project; your words inspire me in the wee hours of the morning as I work.
Joann
PS…A shout out to all my new followers and visitors, especially to
those many who have found my blog thru pinterest.com…what a fun, interesting
and inspiring site it is! I am
constantly amazed at how many miniaturists there are around the world. Some say the hobby is on the decline, but if
your response to my blog is any indication “they” are, I am happy to say,
mistaken….”carry-on”!!!
========================================================================