Friday, March 29, 2013

EASTER IN A SHADOW BOX PART 4


FILLING THE SHADOWBOX
SECTION 3:
THE  
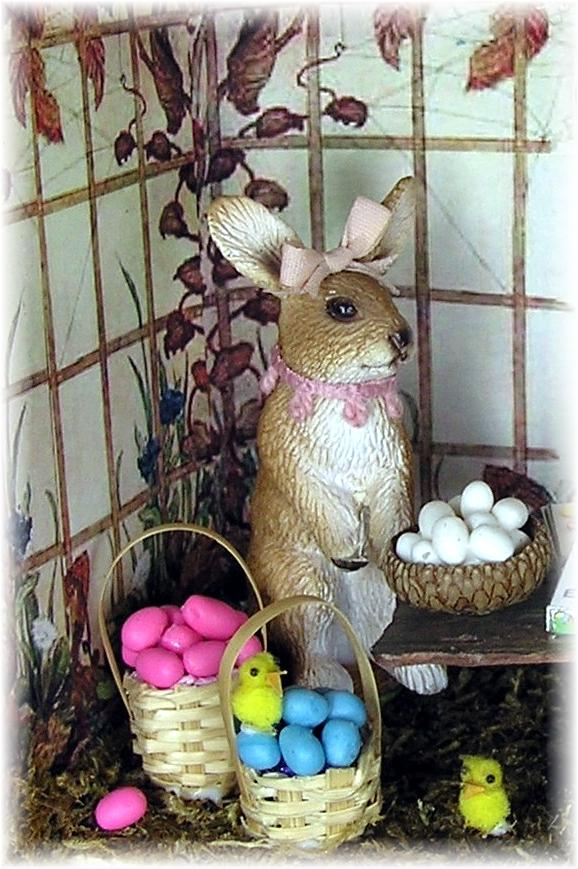
EASTER BASKETS ARE READY FOR THE EGG HUNT
It is Easter morning, the baskets are filled, and the eggs are hidden in the grass.  All is ready for the hunt to begin.  This is the subject of the 4th section of our Easter Shadowbox.

The Background:  Make a color copy of the background graphic onto matte presentation paper using, best printer settings, adjusting the size to fit the walls of the shadowbox section it will be in.  As seen the section is 4 ¼” wide.  I used a dry, deep green watercolor pencil to change the yellow of the grass to a green, nothing artistic here, just simple feathered strokes.   Cut out the piece.  You may choose to add it in one piece or do each wall separately (makes applying to the walls easier).  Use a quality Glue Stick for adhering. 


Save image to your computer.  Print out at 8.97"w x 3.5"h
Print onto matte presentation paper at best settings
-------------
The Flooring:  I used the same self-stick moss as was used in section 2, Adhesive-backed moss (this product is available in craft ((Michaels)), model railroad and floral supply stores).  Although this product is not a must it sure makes the job of landscaping easier and less messy.  Cover the floor and up the wall a bit to add dimension.  I doubled some of the side edges, here and there,
for more dimension and to make the look of the hidden eggs more realistic.


  Fine flowers were added in groups around the perimeter.  These were purchased but one could easily make them using railroad flower landscaping material http://www.amazon.com/Scene-A-Rama-Scenery-Bags-Flowers  and fine wire.


You may choose to hide your eggs now as it is easer before the baskets are in place.  Use the colored eggs you made for section 3…remember, I told you to make extras.  But here is something different you may want to try:  Look in the floral department of craft stores for branches of pastel colored Styrofoam balls.  The balls can be picked off the branch and pinched in fingertips to form ovals...larger ones can be eggs; smaller ones can be used as candy eggs or jellybeans.  


 WOVEN EASTER BASKETS

These Easter baskets are paper strips woven over a form.  They are fun and fairly easy to make.  The size and shape of the form, the width of the strips used and the choice of colors make each basket unique. 

 Choose a form that matches the diameter you desire of your finished basket.  The samples used a ¾” diameter dowel but the form may be small, smooth lids, bottles, etc.  Decide how tall your basket will be and mark a line up from the bottom around the form. 

For the spokes and the weavers, cut colored paper into 1/16” x 5 1/2 “strips.  You may choose to make a solid color basket or a two-toned one…the spokes being one color and the weavers another.

For a ¾” diam. basket you will need 8 full sized spokes and one half the length.  You always need an uneven number of spokes to weave. Glue two spokes together at right angles at their centers.  Continue to glue on the other 6 full spokes in the same manner, centering each around the others.  Glue the 9th spoke on so it fits in an open space.  When the glue has set a bit use needle nose pliers to pinch and compress the center a bit.  


Hold the center of the spoke assembly on the center of the bottom of the dowel- form and with the other hand glue the ends of the spokes on the sides of the form up somewhat from your marked line.  If you glue four spokes that are evenly spaced around the dowel first you can then let go of the top of the spoke assembly while you glue the rest in place.  


To weave, cut one end of a weaver-strip to a point and glue the other end to the inside of one of the spokes, as close to bottom as possible, making sure not to get glue on the form.


  With the help of pointed tweezers, weave the strips in and out of the spokes around the form.  When the first strip is almost used up, glue another weaver strip to it.  Let the glue set just a bit and then continue weaving around, always pushing the weave close and tight.  For this size basket six rows of waving are good.  Stop up form the same place you started the weaving.  Trim excess from the last weaver; glue the cut end under the nearest spoke.  


Cut off all but 1/16” of the spokes that are under the last woven row.  Glue the extending 1/16” down over the last row of weaving to secure it.  


Cut off the remaining spokes in the same manner.  Slip the basket off the form.  Glue the extensions over the last row of weaving on the inside of the basket.


For the top trim, Glue two of the strips together for a double thickness…if you are using two colors, use one of each.  When the glue has set, cut the strip in two lengthwise,  With the fingertips one hand, pinch one end of the strip to hold, and with the other hand twist the strip into a tight corkscrew….with a bit of practice this is easy.  Cut off the end of the twisted paper.  Glue the twist around the top of the basket, just very slightly to the outside edge. 


For the handle, prepare a twisted piece as described above.  Glue one end to the inside of the basket, decide how high you want you handle, cut off excess twist and glue the other end inside the basket.  Use needle nose pliers to pinch and meld handle paper to basket paper.  
If desired the baskets may be finished with a clear, matte medium.


If you enjoyed weaving the basket do explore using other material in the same manner…thinner paper strips, cording, ribbon, etc.


 Easter Basket Grass:  You may have some very fine Easter grass on hand… vintage grass is often very fine and lovely but hard to come byThe finest and most malleable I have been able to make is using tissue paper. Using sharp scissors and four thicknesses of tissue paper cut it into ultra fine strips but not freeing it from the whole paper.  When it is as fine as you can cut it, without shedding it, cut it free.  Roll it into bundles in your hand to compress and wrinkle it.  Fill baskets.  A deep green color is traditional but white or light pastels work well too.  

Filling the Baskets:  Fill your baskets with candy, toys, and other goodies.  As seen  the white basket holds a small story book, dyed eggs, and a pom-pom chick.  The lavender and white one besides candy has a coloring book and crayons.  The blue and yellow baskets has a chocolate bunny and assorted candy.


Story books:  Because these books will not be opened they use matboard as a filler for the pages.  Print the book covers onto matte presentation paper using best printer settings.  Cut out, score and fold. Cut a piece of matte board a scant smaller and glue into cover.


      Chocolate Bunny:  The bunnies are made using a mini plastic candy mold, Country Kitchen Inc.  #90-2119.


      This particular mold has 10 each of rabbits, ducks, baskets and egg on it.  The rabbits are 1” high. The mold can either be used as a press mold with Fimo by first dusting the mold very lightly with cornstarch or with Plaster of Paris.  If using Fimo, choose a brown color and press into mold and smooth out evenly.  Use a needle tool or something similar to lift rabbit out of mold, smooth edges if needed and bake according to Fimo directions, or do as I sometimes do and use a heat gun to cure the clay.  If using Plaster of Paris, follow package directions for mixing and spoon into molds. When plaster has set a bit, smooth off excess plaster, even with mold.  When plaster has set push out the rabbit and when completely dry paint with brown acrylics.  Either way give the rabbit a tan eye and add a bow with paint, dimensional paint, Fimo, silk ribbon, or crepe paper twist.   Use chocolate rabbits to fill Easter baskets or wrap in clear plastic wrap, tied at the top with a silk ribbon bow….whatever, they look good enough to eat, but don’t. 

      Color Book: Print the pages on bright white paper and the cover on matte presentation paper. 
       Cut out the pages in one continuous piece.  Neatly fold the pages sharply, accordion-style, starting on the left-hand side with an inward fold. 
      Keeping the smaller front and back pages free, glue the rest of the pages together in pairs by using a quality glue stick on the back side. Make sure there is no glue on the front of the pages and press the assembly even and flat.
       Cut the cover out and score and on the spine lines.  Glue the page assembly into the cover by its spine and when the spine is in place glue down the smaller facing pages to evenly to the inside of the front and back covers.  Check for excess glue and then press flat until the glue has set.


       Crayons:  This image is an altered version from .  http://www.printmini.com (a great printie site).  Copy and paste image to your computer.  Print box onto matte presentation paper.  Cut out, score, fold and glue sides to tabs
.

----------------------------------

--------------------------

SHADOW BOX TO DATE
---------------------------------------------------

       Well, per usual these days, time got ahead of me and I did not finish this project before Easter as planned.  But not to fret, as the subjects of the next two sections of the Shadowbox will focus on pieces that can be used anytime of year.  And so as soon as the remains of Easter dinner are put away, the family are on their way home, and I have put my feet up for awhile (maybe eating another tiny sliver of cheesecake) I will start on the 5th section of the Shadowbox, Spring Flowers.

     Here is hoping your Easter is/was peaceful, loving, and happy,

Joann


Sunday, March 24, 2013

EASTER IN A SHADOW BOX: FILLING THE BOX


FILLING THE SHADOWBOX

SECTION 3:

DYEING THE EGGS

In the Bunny Burrow Mr. & Ms. E. Bunny are busy dyeing  eggs that will be hidden all over the world for children to discover on Easter morning.  This is the subject of the third shelf in our Easter Shadowbox project.

Copy & save to your computer.  Set to print at 9" x 6.25" using best printer settings.  Print onto matte presentation paper.
-----
The Background:  Make a copy of the background graphic onto matte presentation paper using your printer’s best settings.  The shelf as seen measures 5” wide by 3 ½” high by 2 ½: deep.  Make any necessary size adjustments so the graphic fits your shelf front to back and side to side.
Cut out the graphic and test fit it into your shelf, from front to corner, across back to corner and out to front.  Use a quality glue stick to adhere graphic in shelf.  


The Flooring:  Dried Sphagnum moss (craft store purchase) was used for the flooring.  I put a hand full in a bowl and use scissors to cut it into smaller pieces for ease in applying.  I applied a thick coating of Crafter’s Pick Ultimate glue to the floor. I dumped the moss onto it and pressed it into the glue.  After the glue had set a bit I used a wide soft-bristled paint brush to “sweep” the excess moss off the floor.  Bit of the moss were glued here and there on the front edge of the shelf.


A sign hangs from the back wall.  Print the sign graphic on bright white paper.   Choose which one you want to use and glue it to a piece matt board.  Cut out.  Tint the edges to match the sign with water color pencils.  Glue to back wall 


The Work Table:  Cut a ¾” long segment of ¾” diam. wood doweling for the tree trunk.  Soften a piece of Fimo  (I used #703 stone effect color but any brown color will work).and roll it flat and thin.   Paint the sides of the piece of dowel lightly with tacky glue and wrap the Fimo around it, cutting off the overlap on sides and the excess on top and bottom.  Roll long carrot-shaped pieces of the Fimo and press to sides of the trunk…7-8 of these root pieces should be about right.  Smooth the roots to the side of the trunk and let the pointed end bend out from the bottom….make each root a bit different.  As you add the root pieces keep in mind that they should not extend out from the edges of the table top when assembled.  Use a pointed stylus, or similar tool, to “scrape” the Fimo from top to bottom to add texture.  Use a flat, soft-bristled brush to gently brush off any loose particles of clay.  Bake according to Fimo package directions.  When the piece is cool antique it with a wash of half and half Delta Gel Stain Medium and a dark brown acrylic paint.  If needed, paint your piece a medium brown before antiquing it.


To create the table top; make a color copy of the table-top graphic onto bright white paper, using best photo settings.  Roughly cut out the picture and glue-stick it to a piece of matboard or similar thickness cardboard.  Cut out around the edges of the picture.  Color the bottom of the table top with water color pencil to slightly match the top of the table.  Use a dampened, dark brown water color pencil to color the edges of the table top.
Glue table top to the tree trunk base.

Copy & paste to your computer.  Set to print at 2.75" x 1.58"
Print onto bright white paper at best printer settings
========

Egg Dyeing Supplies: 

Eggs- Using instructions found in Section One of the Shadowbox make lots of Fimo eggs, white and pastel.


Egg dyeing Kit-   Print out the kit onto matte presentation paper using best printer settings.  Cut out pieces.  Score and fold on all lines.  Assemble the box top and lid using a tacky glue.  Insert the platform into the box. Use a 1/8” round paper punch to punch out six rounds of colored paper; glue onto platform as seen.  Form an egg-dipper from fine wire, using photo as a guide.  You may also choose to use a cut out of the dipper diagram instead.  Glue dipper in place.  If you are going to make a dipper separate from the box, bend it up between the holder and handle.  Cut out the holes in the Egg Holder.  Fill egg holder with colored eggs, using a bit of glue to hold. 

Un-dyed Eggs are displayed in a bowl…I used a polished acorn cap for my bowl.  

Glasses of Dye are made using Lite Brite pegs from a child’s game.  The pegs can be purchased separately thru Amazon.com or toy stores.  Cut ¼” sections from the large end; sand the bottom flat if necessary.  You may use them as is or use a Dremel tool to router out the inside of the glasses, deep enough to take an egg or just to enough to look like the glass is not full to the top.  Use clear nail polish to cover any dull spots from cutting or router.


The Bunnies are from Schleich and are sold separately for a few dollars each.  They are quite detailed and very nicely painted. They are about 1-7/8” tall to the top of their heads.  I purchased mine from a local farm supply store.  Amazon.com has them for a few more $$ than I paid over the counter.  
I antiqued them a bit with a medium brown gel stain wash to accent their fur a bit more.  I sliced thru both bunny’s hands with an X-acto knife so they could hold things (watch your fingers…remember, always cut away from yourselves!)..


For Mr. Bunny I made a simple green felt beret to celebrate his artistic work.    I hand sewed a running stitch around the outside of a felt round and pulled it tight.  I cut a hole in the top to accommodate an ear.  A tiny felt “stem” was glued on the top.  A green bow-tie of silk ribbon is around his neck.  In his hand he holds a paint brush.  
Ms. Bunny wears a pink silk bow on her head and a bit of vintage trim around her neck.  She holds a spoon (Chrysnbon). 


Baskets of dyed eggs sit on the ground and a few chicks (see the instructions in the first shelf instructions) have found their way to the burrow to watch the artists.


Next we will fill the next shelf with a group of Easter baskets full of goodies….hopefully in the next few days…Easter is sneaking up on me,
Joann


Saturday, March 16, 2013

EASTER IN A SHADOW BOX :FILLING THE BOX

FILLING THE BOX
SECTION TWO:
DELIVERING THE EGGS


Did you ever wonder how the Bunnies got the eggs they needed for Easter?  Well now you know and what a perfect subject to fill the 2nd section in our Shadow Box.
===========
The Rabbit:
Make a copy of the rabbit image onto matte presentation paper using best printer settings.  Carefully cut the image out that is facing right.  Cut the rabbit’s right arm from the front edge of the image to up past the elbow, following the black line.  Using the edge of a black permanent marker pen, color the very cut edges of the image.  Set aside

SET TO PRINT AT 3.27"W X 3.02"H
PRINT ONTO MATTE PRESENTATION PAPER
USING BEST SETTINGS
=====
The Background:

SET TO PRINT AT 10" W X 3.8" H
PRINT ONTO MATTE PRESENTATION PAPER
USING BEST SETTINGS
====
In my shadow box this section is 5 ½” w x 2 ½” deep.  A matte presentation paper copy of a vintage landscape was used as the background.  If you choose to use the same one this is what I did: I trimmed the sky area from the printie; around the trees I made slightly jagged cuts. I tried the cutout out in box with the left edge of the printie even with the left front edge of the section being decorated and clipped it in place to hold.  The printie in the back left corner curves around it rather than being glued in the corner, adding dimension.  With the curve in place I smoothed the printie to the right corner and marked where it would be creased to fit in that corner.  I then smoothed the printie to the right front edge and marked it with a crease.  I removed the printie and made a sharp crease for the right corner and trimmed the right side to the marked size.  If you hold the right side of the printie to the right side of the section it will be placed in, you will notice that it would extend out over the edge of the shelf and does not look quite right.  To solve this I trimmed the lower right corner of the printie back from the edge (see photo).


Looking at the left side of the printie, about a third of the way up from the bottom you will see a black line-like image.  Slice a slit across this line; this will be where the rabbit will be inserted.  Insert the rabbit so his hand is outside of the background and hold with a clip, trim off the bottom of rabbit that extends beyond the bottom of the background.  Place the background in the box; hold with a clip for a try-on. The rabbit should look somewhat like he is standing behind a hedge with his right hand extending out a bit so he can hold a basket. Adjust as necessary.  


Remove background printie.  Glue lower half of rabbit in place on back of printie. 
Cut a piece of adhesive-backed moss (this product is available in craft ((Michaels)), model railroad and floral stores, although it is not a must ((model railroad landscaping sheets or foam   http://www.amazon.com/Woodland-scenics-green-grass may also be used)) but the adhesive backed moss is so easy to work with)  to fit on the area of the background in front of the rabbit to  enhance the hedge look.

When your background is prepared glue it into the box by the left front edge, the right corner and right side.  Use a quality glue stick.   Lay the box on its back and dab tacky glue over the foliage on the trees in the center of the back ground.  Sprinkle model railroad, blended green turf  
http://www.amazon.com/Blended-Turf-Shaker   over the glue and pat it lightly.  Before the glue has set use a toothpick to slightly open up some of the areas.  This will add more dimension to the scene.  Tap the back of the box slightly to shake off any excess turf and clean box of any excess.


Cut a piece of the adhesive moss to fit the shelf and press on place.  Adhere some bits and pieces to the shelf’s front edge.


You may choose to add some tiny decorative flowers in front of the “hedge” for a bit of color and added interest.  For ease, I purchased mine ready made but one could easily make them using railroad flower landscaping material http://www.amazon.com/Scene-A-Rama-Scenery-Bags-Flowers  and fine wire.  


Glue a tiny woven basket into the rabbit’s hand.

The Cart:


You may choose to cut your own wood for the cart or do as I did and use Woodsies, pre-cut pieces…they come in oh so handy for fast little wood projects.


If you cut your own wood pieces use the measurements given on the photo. 
Glue the face of the ends to the edges of the bottom.  Glue the face of the sides to the edges of the bottom and ends.  Make sure all is squared-up and set aside until glue has set.  Sand all surfaces smooth. 
Cut a 1/16” wide strip of matte presentation paper (a good way to use up scraps left over from printies) and glue it around the top and bottom outside face of the cart.
Paint inside and out with 2 light coats of acrylic paint in color of your choice…I used a barn red.  When the paint has dried antique with a medium wash of brown acrylic and Delta’s Gel Stain Medium http://www.amazon.com/s/ref=nb_sb_noss?url=search-alias%3Daps&field-keywords=delta+gel+stain+medium.  Paint on the wash and wipe back off while it is still wet, in the direction wood grain would go.  When all is dry you may sand a bit here and there for an aged look.

Make cart sign printies on matte presentation paper using best printer settings.  Cut out.  Color the edges with a black permanent marking pen.  Glue signs to sides of cart, just under the top trim and centered side to side.

To make the two wheels, punch eight, ½” rounds for each wheel from a scrap of matte presentation paper.  Stack together, evenly, using a quality glue stick.  From the same paper, punch out a decorative spoke the same as or similar to the one shown and 1/8” rounds.  Center the spoke on the front of the wheel, and the round centered on it.  Centered on the back side of each wheel, drill or file out a hole, wide enough to take the blunt end of a round toothpick and deep enough to hold it in place a bit.   Paint the wheels a deep green and antique with the same wash used for the cart.  Color the edges of the wheels and the center round with black permanent marker pen.  You may also choose to Very lightly rub on some silver Rub ‘n Buff.


For the axle, measure across the bottom of your cart, side to side, and cut a round toothpick (points cut off)1/8” longer than this measurement .  Paint it black and when dry glue the ends into the recesses in the back of the wheels.  Glue the completed wheel assembly across the underside of the cart, centered evenly each way


Fill the cart with eggs following egg instructions given in filling section one of the shadow box.  You may use a fill in the bottom of the cart and just top with a layer or eggs.

The Rooster:

The rooster I used is from Safari LTD Toob Down ON THE FARM  http://www.amazon.com/Safari-LTD-Down-Farm-Toob .This comes with a variety of animals and  the nicest rooster I could find for the price.  Note: the Safari roosters sold separately are too large and the Farm animal Toob rooster is not as nice.  I painted his comb and feet and antiqued his white feathers a bit.


For the harness, cut a strip of very thin leather, suede, cording or ribbon 1/16” to 3/32” wide.  Glue a piece around the chest from side to side.  Glue another piece from the ends of the first piece, up and over the rooster’s back, just below the neck area.    Cut two lengths of very thin bamboo sticks ( look for bamboo runner, etc. at 2nd hand store…the wood is great because of its strength when cut very thin).  If you can’t find the bamboo you may choose to use lengths of wire.  

Cut lengths that will reach from the side of your rooster where the two parts of the harness touch to the side of the cart…the length will depend on how far you want your rooster from your cart.  Tie a knot of your harness material on one end of each of the sticks approx. 1/16” from the front end.  Hold the knot with glue and cut off all excess, leaving just the knot.  Glue the knot over the area on the rooster where the two harness parts meet, to cover it…use tacky glue so there is some flex in it and attach the other end to the side of the cart, as shown in photo.  You can adjust where the stick touches the cart if needed to make sure the rooster and cart line up. Should you use a different rooster.


For fun, add a few chicks (follow directions given in section one of filling the cart) on the cart who have hitched a ride with their dad.
Add the cart to you scene so the rooster and rabbit are looking at each other.


Now that the Easter Bunny has his eggs he is getting ready to prepare them for Easter…which will be the subject of Section 3 of the Shadow Box.

See you soon,
Joann